

Appearance
AI Autofill
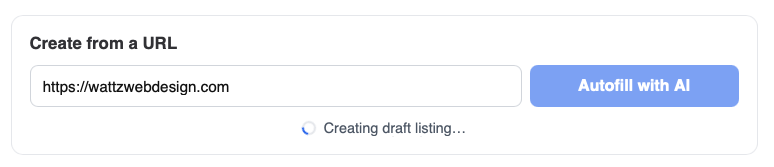
AI Autofill lets a user paste a website URL, a Google Maps link, or a business name and have AI fill out a new Voxel listing draft — title, description, categories, location, opening hours, images, and more — in a single step. It adds an AI Autofill (VT) Elementor widget you place on your listing submission page.
It's built for directories and marketplaces where you want to remove the friction of manual data entry: a submitter drops in a link, reviews what the AI found, and continues to a ready-to-edit draft.
Key features
- Autofill a listing from a website URL, a Google Maps link / Place ID, or a plain business name
- Fills text, categories, amenities, location, opening hours, and images into your existing Voxel fields
- Uses the same AI provider and key you already configured in Voxel Toolkit → AI Settings — no second AI to set up
- Optional preview step so users confirm what the AI found before the draft is created
- Optional Google Places lookup for business-name and Maps-link input, including business photos
- Optional AI vision curation, alt text, and image titles for sideloaded images
- Per-user and per-IP daily limits to control cost and abuse
- Image-rights consent checkbox for public submissions
Requirements
- The Voxel theme must be active
- An AI provider configured in Voxel Toolkit → AI Settings (OpenAI, Anthropic, or the native WordPress AI on WordPress 7.0+)
- A Google Places API key — only if you want to support Google Maps links, Place IDs, or business-name input. Website URLs work without it.
Setup
- Enable the function. Go to Voxel Toolkit → Functions, find AI Autofill, and turn it on.
- Configure AI. Open the AI Settings tab and choose your provider and API key — see AI provider configuration below. AI Autofill shares this configuration with the rest of Voxel Toolkit.
- Set your options. Back under the AI Autofill function, set your rate limits, preview behaviour, image handling, and — if you want business lookups — your Google Places API key. See Settings.
- Add the widget. Edit your listing submission page with Elementor, search the widget panel for AI Autofill (VT), and drop it in above the submission form. Save.
- Test it. Open the submission page while logged in, paste a business website URL, and select Autofill with AI.
Logged-in users only
The widget is visible to logged-in users only, because it creates a draft owned by the current user.
AI provider configuration
AI Autofill does not store its own API key. It uses whatever is set in Voxel Toolkit → AI Settings, so every AI-powered feature in the toolkit shares one configuration.
| Provider | What you configure |
|---|---|
| WordPress AI (Recommended) | Nothing here — it uses WordPress's own native AI Client. Requires WordPress 7.0 or later. |
| OpenAI | Your OpenAI API key and model. |
| Anthropic (Claude) | Your Anthropic API key and model. |
Using WordPress AI (Connectors API)
On WordPress 7.0 and later, choose WordPress AI (Recommended). Instead of entering a key in Voxel Toolkit, you configure your AI provider once in WordPress itself and every plugin can use it.
- In AI Settings, set AI Provider to WordPress AI (Recommended).
- Select Configure WordPress AI Connectors — this opens Settings → Connectors — and set up your provider and key there.
- Back in AI Settings, select Test Connection to confirm it works.
- Save.
If the status shows Not configured, no WordPress connector has been set up yet.
Settings
All options below appear in the AI Autofill function panel under Voxel Toolkit → Functions.
Limits
| Setting | Description | Default |
|---|---|---|
| Per-user daily limit | Maximum autofills one logged-in user can run per day. -1 = unlimited; 0 or blank uses the safe default. | 10 |
| Per-IP daily limit | Maximum autofills per source IP per day. -1 = unlimited; 0 or blank uses the safe default. | 30 |
| Max input length (bytes) | Maximum size of the URL or text submitted by the widget. | 2048 |
| Max HTML size (KB) | Maximum amount of HTML read from each crawled page. | 500 |
Preview and presentation
| Setting | Description | Default |
|---|---|---|
| Show preview before redirect | Show a summary of what the AI found and let the user confirm before the draft is created. Recommended for paid post types. | On |
| Compact preview list | Render the preview field checklist as a single-column flat list instead of grouped sections. | Off |
| Loading screen messages | Optional overrides for the title, subtitle, rotating steps, and done message shown while the AI works. | Defaults |
| Per-post-type prompt extensions | Extra instructions the AI should follow for each post type — for example, "always extract menu items into the repeater field". | — |
Images
| Setting | Description | Default |
|---|---|---|
| Sideload images | Download remote images into the WordPress media library. Turn off for marketplaces where users must upload their own photos. | On |
| Background image sideload | Download images in a background job so the user reaches the draft faster. Automatically disabled when Voxel Toolkit's Image Optimization is active. | Off |
| Vision-based image curation | Have the AI visually rank candidate images before choosing logo, featured, and gallery images — rejecting logos, icons, and blurry shots. | Off |
| AI alt-text for images | Generate accessibility alt text for each sideloaded image. | Off |
| AI title for images | Save a short descriptive title to each sideloaded image instead of the default filename. | Off |
Google Places
| Setting | Description | Default |
|---|---|---|
| Google Places API key | Enables Google Maps links, Place IDs, and business-name input. Requires Places API (New) on your Google Cloud project. | — |
| Photos to fetch from Places | How many business photos to pull from Google Places. Each costs a small fee — set to 0 if users upload their own. | 6 |
| Prefer owner photos | Sort owner-uploaded photos ahead of customer and reviewer photos. | Off |
| Places fallback | When a website crawl finds fewer than N images, also query Google Places to supplement. | On |
Safety
| Setting | Description | Default |
|---|---|---|
| Image & content rights consent | Require the submitter to confirm they have the right to use the images and content before extraction. Recommended for public submissions. | Off |
| Content moderation | Run extracted content through a moderation check before it's applied. | Off |
Where place lookups search
Business-name lookups go to Google Places. By default Places searches the whole world, so typing a common business name can return a match on the other side of the planet.
AI Autofill limits the search to the countries you have already set in Voxel → Settings → Maps → Google Maps → Autocomplete → Countries — the same list Voxel uses for its own location field, and the same one it sends to Google. There is nothing to configure here: if you have already limited Voxel's location suggestions, autofill matches them.
Sites running Mapbox for their maps fall back to the Mapbox country list instead. With no countries configured anywhere, lookups stay worldwide, exactly as before.
The dropdown is restricted; the direct lookup is biased
The suggestions dropdown is hard-limited to your countries. The secondary lookup used when a full business name is resolved directly can only be biased toward a region — Google's Text Search endpoint accepts a single region hint rather than a country restriction. So a pasted name is steered to your region rather than fenced to it.
Using the widget
Once the widget is on your submission page, a logged-in visitor:
- Pastes a website URL, Google Maps link, Place ID, or business name into the Create from a URL box.
- Selects Autofill with AI.
- Reviews the fields the AI extracted and confirms — if the preview step is enabled.
- Lands on the draft, pre-filled and ready to edit and publish.
The most reliable input is the business's own website URL. Google Maps links and business names rely on the Google Places lookup, so they need a Google Places API key configured.
The preview step
With Show preview before redirect enabled, the user sees what the AI found before any draft is created — a summary of the source, a count of what was extracted, and a per-field checklist they can edit and deselect.

Fields the AI is less confident about are flagged DOUBLE-CHECK — location is a common one, since a street address parsed from a website can be incomplete. Unticking a field leaves it out of the draft entirely.
Use cases
- Directory onboarding — let business owners submit a listing by pasting their website, instead of filling every field by hand
- Bulk-building a directory — quickly seed listings from a list of business websites or Google Maps links
- Event and place submissions — pull address, hours, description, and photos in one step
- Paid submissions — pair with the preview step so users see the value before they pay
Troubleshooting
"The AI provider could not complete this request."
Your AI provider isn't reaching the model. Open Voxel Toolkit → AI Settings and confirm a provider and key are set — or, for WordPress AI, that a connector is configured. On WordPress AI, select Test Connection. If it still fails, try a business website URL instead of a Google Maps link, or switch to a faster model.
The autofill takes too long or times out
Large pages and slower models take longer. Try the business's website URL instead of a huge page, switch to a faster model, lower Max HTML size (KB), or turn off Vision-based image curation.
A Google Maps link or business name doesn't work
These inputs require a Google Places API key with Places API (New) enabled on your Google Cloud project. Add it under the AI Autofill settings. Website URLs work without a Places key.
The AI Autofill widget isn't in the Elementor panel
Make sure AI Autofill is enabled under Voxel Toolkit → Functions, then reload the Elementor editor. Search the widget panel for AI Autofill (VT).
WordPress AI shows "Not configured"
No WordPress AI connector has been set up yet. Select Configure WordPress AI Connectors, or go to Settings → Connectors, and configure a provider and key. This option requires WordPress 7.0 or later.
Images aren't being imported
Confirm Sideload images is on. For Google Maps or business-name input, make sure Photos to fetch from Places is greater than 0 and your Google Places key is set.
Developer reference
AI Autofill exposes four filters — see the Developer Reference for the full list.
| Filter | Purpose |
|---|---|
voxel_toolkit/ai_autofill/settings | Filter AI Autofill's settings |
voxel_toolkit/ai_autofill/store | Filter the data written to the draft |
voxel_toolkit/ai_autofill/embedded | Control embedded mode |
vaia/places/region_codes | Override the countries place lookups are restricted to |