

Appearance
Message Attendee Widget
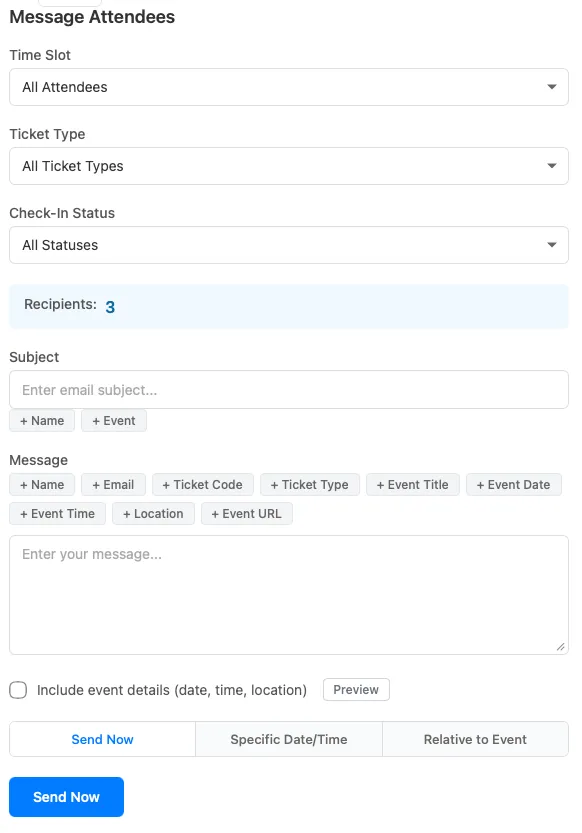
The Message Attendees widget lets you send emails to everyone who bought tickets to your event. Use it to share important updates, last-minute changes, or helpful information before event day.
Adding the Widget
- Create or edit your event management dashboard page
- Edit with Elementor
- Search for Message Attendees in the widget panel
- Drag the widget onto your page
- Configure the settings
- Publish the page
Who Can Send Messages
- Event authors: Message attendees of events they created
- Site administrators: Message attendees of any event
Composing a Message
Step 1: Select the Event
Choose which event’s attendees you want to message:
- Current event: If on an event page, messages go to that event’s attendees
- Select from dropdown: Choose from your events
- Specific event ID: Enter a particular event’s ID
Step 2: Choose Recipients
Narrow down who receives your message:
All Attendees
Send to everyone who has a ticket.
By Time Slot
Select specific sessions:
- Saturday morning session only
- Sunday VIP dinner only
- All Friday events
By Ticket Type
Target specific ticket holders:
- VIP ticket holders
- General admission only
- Early bird purchasers
Combining Filters
You can combine filters. For example: VIP tickets for Saturday evening = only VIP holders attending Saturday evening.
Step 3: Write Your Message
Subject Line
- Keep it clear and relevant
- Include your event name
- Make it easy to identify in inbox
Example: “Important Update: Parking Information for Summer Festival”
Message Body
Write your message using the editor:
- Format text (bold, italic)
- Add bullet points or numbered lists
- Include links
- Keep it concise and actionable
Step 4: Choose When to Send
Send Immediately
Message goes out right away. Use for:
- Urgent updates
- Last-minute changes
- Important announcements
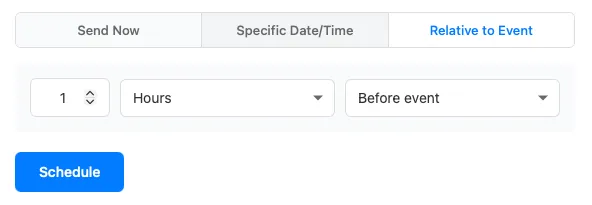
Schedule for Later
Pick a specific date and time:
- Click “Schedule”
- Select date
- Choose time
- Messages send automatically
Relative Scheduling
Send based on event timing:
- “3 days before event”
- “1 week before event”
- “Morning of event”
Great for automated reminders!
Recipient Count
Before sending, you’ll see:
- Total recipients: How many people will receive the message
- Email count: Total emails to be sent (may differ if one person bought multiple tickets)
Always verify this number looks right before sending.
Email Delivery Settings
Large events may have hundreds or thousands of attendees. To prevent server overload:
Batch Processing
Emails are sent in batches:
- Batch size: How many emails per batch (default: 50)
- Batch delay: Pause between batches (default: 5 seconds)
Hourly Limits
Your site may have email limits:
- Check with your hosting provider
- Configure in Voxel Events settings
- Messages queue if limits are reached
Delivery Status
After sending, you can see:
- Emails sent
- Emails pending
- Any failures
Widget Settings
Event Source
- Current Post: Uses the current event page
- Dropdown Selection: Let the user choose from their events
- Specific Post ID: Hardcode a particular event
Available Filters
Enable or disable recipient filtering options:
- Time slot filter
- Ticket type filter
- All attendees option
Editor Options
- Editor type: Simple text or rich text
- Character limit: Maximum message length
- Template messages: Pre-written options to choose from
Best Practices
When to Message Attendees
Good reasons to message:
- Venue or time changes
- Parking and arrival information
- What to bring or expect
- Weather-related updates
- Last-minute important details
Avoid:
- Multiple promotional messages
- Information already on the event page
- Non-urgent updates (add to event page instead)
Writing Effective Messages
Do:
- Get to the point quickly
- Include action items clearly
- Provide contact info for questions
- Use clear subject lines
- Test links before sending
Don’t:
- Write walls of text
- Send multiple messages for one update
- Include attachments (use links instead)
- Use all caps or excessive punctuation
Timing Your Messages
Immediate send:
- Urgent changes
- Day-of updates
- Time-sensitive information
Scheduled messages:
- Reminder emails (1-3 days before)
- Preparation information (1 week before)
- Thank you messages (after event)
Common Uses
Pre-Event Reminder
Send 1-2 days before:
- Arrival time and location
- Parking information
- What to bring
- Weather considerations
Last-Minute Update
Send day of event:
- Venue changes
- Time adjustments
- Emergency contact info
Session-Specific Information
Target specific time slots:
- Morning session: Breakfast available
- Evening session: Bar opens at 7pm
- VIP only: Early entry at doors
Post-Event Follow-up
After your event:
- Thank attendees
- Share photos or recordings
- Announce next event
- Request feedback
Troubleshooting
Message not sending
- Check your internet connection
- Verify you have permission for this event
- Make sure email settings are configured
- Check if you’ve hit hourly limits
Wrong recipient count
- Review your filter selections
- Make sure you selected the right event
- Check if tickets have been cancelled
- Refresh the page for latest data
Attendees not receiving emails
- Check spam/junk folders
- Verify email addresses are correct
- Check your email delivery settings
- Contact your hosting provider about email limits
Scheduled message didn’t send
- Check that WordPress cron is running
- Verify the scheduled time has passed
- Look for error messages in the queue
- Contact support if issues persist
Email Settings
Configure email behavior in Event Tickets → Settings:
Batch Size
How many emails to send per batch:
- Smaller = slower but safer
- Larger = faster but may trigger limits
- Recommended: Start with 50
Batch Delay
Seconds between batches:
- Prevents overwhelming your server
- Recommended: 5-10 seconds
Hourly Limit
Maximum emails per hour:
- Check with your hosting provider
- Set to 0 for unlimited (not recommended)
- Common limits: 500-5000 per hour